Nepal Flag
"Would you Like to Post any thing related to This blog you can send E-mail to me guidedinesh@gmail.com or dinesh_tamang33@yahoo.com"तपाईंहरु पनि यो साईटमा भएका बिषयहरु सँग सम्बन्धित आफ्ना लेखहरु पोस्ट गर्न चाहनु भने तल दिईएको ठेगानामा पठाउनु हुन अनुरोध गर्दछु साथै विज्ञापन तथा अन्यको लागि सम्पर्क ठेगानाः guidedinesh@gmail.com or dinesh_tamang33@yahoo.comतपाईंहरुबाट प्राप्त भएका आर्टिकलहरुलाई सकेसम्म चाडै तपाईंहरुकै नाम दिएर प्रकाशित गरिनेछ ।

FREE custom domain for BLOGGER

Posted by Unknown on | 0 comments | Leave a comment...

How to get a FREE top level custom domain for your blog from blogger.com (Blog from google). These domains are from Freenom.com and you can get
.ga
.cf
.tk
.ml
.gq
domains for FREE! indefinitely!

Go to www.freenom.com for the domains.

======================================================================================================================
A Records (common A records)
======================================================================================================================
216.239.32.21
216.239.34.21
216.239.36.21
216.239.38.21
======================================================================================================================

Like it and share it if you found this helpful. If there's anything to be corrected please let me know in the comments.
More how to videos will be done soon enough so stay tuned. 

विन्डाेज १० कसरी इन्स्टल गर्ने? विधि सहित

Posted by Unknown on | 0 comments | Leave a comment...


माइक्रोसफ्टले हालै  आफ्नो नयाँ ओपरेटिङ सिस्टम ‘विन्डोज १०’ उपलब्ध गराएको छ  । गत सेप्टेम्बरमा विन्डोज इनसाइडरमार्फत परीक्षणको रुपमा विन्डोज १० उपलब्ध गराएको माइक्रोसफ्टले त्यसमार्फत रजिष्टर गरेका ५० लाख प्रयोगकर्ताहरुलाई विन्डोज १० निस्शुल्क अपग्रेड गर्ने सुविधा दिएको छ । त्यस्तै यो सुविधा सबैलाई एकैपटक नदिइने भएकाले धेरै प्रयोगकर्ताहरु अझै यसको प्रयोगका लागि प्रतिक्षा गर्नुपर्ने भएको छ।

उक्त विन्डोज इन्साइडरमा नाम दर्ता नगरेकाले पनि यो सफ्टवेयर डाउनलोड गर्न पाउने सुविधा रहेको छ।  जेन्युन ओपरेटिङ सिस्टमहरु विन्डोज ७ वा ८ प्रयोग गरिरहेका प्रयोगकर्तालाई लक्षित गरेर माइक्रोसफ्टले विन्डोज १० आइएसओ फाइल सार्वजनिक गरेको छ। यसको प्रयोग गरी विन्डोज अपडेटबिना नै विन्डोज १० इन्स्टल र एक्टिभेट गर्न सकिन्छ।

यो टुलबाट सिधै माइक्रोसफ्ट विन्डोज १० इन्स्टल  गर्नअुघि केही प्रक्रिया पुरा गर्नुपर्नेछ। । आफ्नो सिस्टम ड्राइभमा पर्याप्त डिस्क स्पेस र सेटअप फाइल डाउनलोड गर्न इन्टरनेट स्पिड पनि हुनुपर्छ । त्यस्तै पिसी जेन्यसन जेन्युन विन्डोज ७ वा ८ बाट सञ्चालित भएको हुनुपर्छ ।

विन्डोज १० इन्स्टलको लागि माइक्रोसफ्टको यो साइट लगइन गरी मिडिया क्रिएसन टुल डाउनलोड गर्नुपर्छ। यसका लागि ३२ बिट वा ६४ बिट भर्सनको डाउनलोड टुल छनौट गर्नुपर्ने हुन्छ ।

विन्डोज १० मिडिया क्रिएसन टुल इन्स्टल गरेपछि इन्स्टल  भएको फाइलमा क्लिक गर्ने। केही सेकेन्डपछि नयाँ विन्डो आउनेछ, जहाँ  what do you want to do? भनेर सोध्छ र दुईवटा अप्सन दिन्छ । अपसन upgrade this PC now मा क्लिक गर्ने र Next गर्ने। इन्स्टलेसनका क्रममा प्रयोगकर्ताको पिसी रिस्टार्ट हुन्छ।

अर्को पिसीका लागि फ्रेस इन्स्टल गर्नुपर्ने हो भने चाँही दोश्रो अप्सन Create installation media for another PC गर्ने। 

पहिलो अप्सन छानेपछि पिसीमा नयाँ विन्डो देखा पर्छ । जसले विन्डोज १० डाउनलोडको प्रक्रिया भएको संकेत दिन्छ । केही मिनेटपछि डाउनलोड सुरु हुन्छ र प्रोगेस इन्डिकेटर विस्तार बढेको देखिनेछ । 

डाउनलोड प्रोसेस सकिएपछि पिसीमा नयाँ विन्डोज देखापर्छ जहाँ Creating Windows 10 media भनेर म्यासेज आउँछ। प्रोग्रेसको काम भइरहँदा ब्याकग्राउन्डमा अन्य काम पनि गर्न सकिनेछ। यो क्रममा पिसी चारर्जमा जोड्ने । 

विन्डोज १० मिडिया टुल क्रिएट भएपछि पिसीमा एउटा नयाँ सानो विन्डो देखापर्छ जुन सेटअप पिसी विन्डोज १० को इँन्स्टलेसन प्रक्रियामा जान हो र यसका लागि केही समयसम्म कुर्नुपर्छ ।

यसपछि getting updates स्टेप आउनेछ जहाँ पिसीले सेटअपका लागि चाहिने अपडेटहरु डाउनलोड गर्छ ।

अब विन्डोज १० इन्स्टलेसनका लागि पिसीमा पर्याप्त स्पेस छ कि छैन भनेर नयाँ विन्डो देखापर्छ । स्पेस पर्याप्त छैन भने सेटअप नै एबोर्ट हुन्छ भने पर्याप्त छ भने विन्डोज १० सेटअप थप प्रोसेसमा बढ्छ ।

पिसी रिबुट पछि विन्डोज १० अपग्रेडका लागि इन्ष्टलमा क्लिक गर्ने। अब फेरि पिसी रिस्टार्ट हुन्छ ।

पुनः रिबुटपछि विन्डोज १० सेटअप पुनः सुचारु हुन्छ र इन्स्टलेसन प्रक्रिया अगाडि बढ्छ ।

इन्स्टलेसन प्रक्रिया सकिएपछि पिसी पुनः रिस्टार्ट हुन्छ र Upgrading Windows  भन्ने म्यासेज आउँछ। यसमा तीन स्टेप हुन्छन्ः  Copying files, Installing features and drivers, and Configuring Settings. विन्डोज १० अपग्रेड गर्ने यो अन्तिम स्टेप हो । यो क्रममा पिसी बारम्बार रिस्टार्ट हुन्छ । 

सबै स्टेप पुरा गरेपछि अब  पिसी विन्डोज १० मा अपग्रेडेड हुन्छ। नयाँ अपरेटिङ सिस्टमका लागि लगइन गर्ने र नयाँ विन्डोका लागि कन्फिग्युरिङ सेटिङमा जानुपर्ने हुन्छ ।

यहाँ नयाँ विन्डो देखिन्छ जसमा विन्डोज १० का नयाँ एप्स पनि हुन्छन्, फोटो, माइक्रोसफ्ट एज, म्युजिक, मुभी र टिभी । अब Next क्लिक गरेपछि विन्डोज पिसी प्रयोग गर्न तयार हुन्छ।  

सबै सेटिङ, फाइल, र एप्स आफै इन्स्टल भइसकेका हुन्छन् र महत्वपूर्ण एप्सहरु टास्कबारमा पनि हुन्छन् ।

How to Post Automatically From Blog Post To Facebook Like Page

Posted by Unknown on | 0 comments | Leave a comment...

How to register .com.np domain and get it working with your blogger

Posted by Unknown on | 0 comments | Leave a comment...

After so many months of trying I finally got my new http://www.mrakesh.com.np/ domain got working. So, here I am to share how I did it so that you might not waste 6 more months just to do what could be done in a week or less.

Here are the procedures I have been through.
First of all you need to have a domain name. If you want a ".com" ".info" etc domain you need to purchase that domain. So, instead you can use ".com.np" domain which is free for Nepali Citizen or Organization of Nepal. You can get more information about domain registration at MOS website. 
This is what I did. Since my blog is purely for personal purpose I have to choose either my name (i.e. one that is in your citizenship) or in my case rakeshmanandhar.com.np was already taken so I have to choose either mrakesh.com.np or rakeshm.com.np (where 'm' stands for my sir name). So, I preferred "mrakesh.com.np". 
Since we still need to host the blog at blogspot.com we only need domain hosting. (i.e. just redirect the blog to the new domain) So, for this we have to use some free domain hosting service for which I chosehttp://freedns.afraid.org/. Now open the link and register/sign up.
Then go to http://register.mos.com.np/form.asp and then fill up the form with your personal information and when you reach "Primary Name Server" fill the form as in the image shown. 

NS1.AFRAID.ORG (67.19.72.206)
NS2.AFRAID.ORG (174.37.196.55)

NS3.AFRAID.ORG (72.20.15.61) [optional]
NS4.AFRAID.ORG (174.128.246.102) [optional]
And then write and application letter and drop it in their office located at Durbar Marg, Kathmandu or fax the letter with a photocopy of your citizenship.
Now, in 2 days your domain will be registered and you will be notified by email.

So, the first step is complete and now we still have to configure in freedns which you earlier signed up. Login to http://freedns.afraid.org/. Then click 'Domains' on left bar and click 'Add a domain' as in the following image.Then in domain field type the domain name you registered with earlier in Mercantile Office Systems; in my case "mrakesh.com.np"; then click submit.

Now, click 'Subdomains' on left bar and click on the added domain (i.e. in my case www.mrakesh.com.np) 

After that select 'CNAME' as type and put 'www' in Subdomain and 'ghs.google.com' in Destination as in the following image. 
Now you have to wait at least 48 hrs. to 2 days for your dns settings to work.

Now login to your blogger and then put your registered domain in blogger's settings in Publishing. 
Use full address i.e. in my case http://www.mrakesh.com.np/

That's all and you now have a new domain set up for blogger.

How To Open Blocked Websites

Posted by Unknown on | 0 comments | Leave a comment...

Setup WebSiteVPN Free PPTP Account in Windows 7
  1. From Windows 7 Desktop, click Start – Control Panel to open the control panel;
  2. Click Network and Internet;
  3. Click Network and Sharing Center;
  4. Click Set up a new connection or network, then Connect to a workplace;
  5. Select option No, create a new cnonection, then Use my Internet connection (VPN);
  6. In the Connect to a workplace window, fill VPN Server hostname as websitevpn.com;
  7. In Next window, use websitevpn.com in the User name field, and use freevpn in the Password field;
  8. Click “Connect” button to start the free VPN connection.
Setup WebSiteVPN Free PPTP Account in Apple iPhone, iPad and iPod Touch
  1. From iPhone, iPod touch or iPad, Press iPhone, iPod touch or iPad’s Home button;
  2. Touch “Settings” icon, select VPN – Add VPN Configuration …
  3. Select ‘PPTP’, adding fields as:
    • Description: WebSiteVPN.COM
      Server: websitevpn.com
      Account: websitevpn.com
      RSA SecurID: OFF
      Password: freevpn
      Encryption level: Auto
      Send All traffic: ON
  4. Touch ‘save’ button to save the VPN configuration;
  5. Slide the VPN status button from OFF to ON position, wait until VPN connected.
Setup WebSiteVPN Free PPTP Account in Google Android 2.3 and 4.0 system
  1. From Andord smartphones, tablets, or set tp boxes, switch back to Home screen;
  2. Touch “Settings” icon, touch More… – VPN text bar;
  3. Touch “+” button to add a new VPN profile, and fill the VPN fields as below:
    • Set “Name” as “WebSiteVPN.COM”;
      Set “Type” as PPTP;
      Set “Server address” as websitevpn.com;
      Checked “PPP encryption (MPPE)” option;
  4. Touch “Save” button to save the VPN connection;
  5. Touch “WebSiteVPN.COM” text bar to connect the VPN, Android will prompt the username/password information;
  6. Enter websitevpn.com as the VPN username, and enter freevpn as the password;
  7. Touch “Connect” button to start the VPN connection, wait until VPN is connected.
Setup WebSiteVPN Free PPTP Account in Windows XP
  1. From Windows XP desktop, click Start – Control Panel to open the control panel;
  2. Click Network Connections icon, open the Network Connections window;
  3. Click Next button to get the first “New Connection Wizard” Welcome window;
  4. Select “Connect to the network at my workspace” in “Network Connection Type” window, click Next;
  5. Select “Virtual Private Network connection” in “Network Connection” window, click Next;
  6. Enter WebSiteVPN.COM as the VPN connection name, click Next;
  7. Enter VPN Server hostname as websitevpn.com, click Next;
  8. Click “Finish” button.
  9. Now the VPN login window shows up,use websitevpn.com as the User name and freevpn as the password, click “Connect” button to start your free Win XP VPN connection.

-Free Website VPN

Basnetg NEWSLINE Blogger template

Posted by Unknown on | 0 comments | Leave a comment...

Basnetg NewsLine is a Premium Blogger template/PremiumBloggertemplate helps you to start up your own NEWS website on Blogger quickly. It features professional style blogger template for newspapers and magazine sites and works all major browsers, chrome,internet explorer,firefox,safari and opera. Please use this template for free but do not remove the designer link.Thanks


How to install Basnetg NewsLine template for Blogger

  • Download the template Zip Folder from Download Link above.
  • extract all  with help of win zip.
  • Upload template XML file to blogger .
Configure Your Meta Tags 
  • Find below meta tags and change description and keywords in red with your blog description and keywords. Separate keywords with comma.
<meta content='DESCRIPTION HERE' name='description'/>
<meta content='KEYWORDS HERE' name='keywords'/>
How to change Header Logo

  1. Go to Dashboard Click Template option from Dashboard
  2. Now click on Edit HTML tab.
  3. Click on Proceed tab
  4. Now Find this code :
<div id='left_header'><a expr:href='data:blog.homepageUrl'><img height='80' src='https://blogger.googleusercontent.com/img/b/R29vZ2xl/AVvXsEj972uLkJ1yl7z0ABfLyDCPiMM3jkdUp40RaT585WBprYqZzcSbiTqC7lfvqc2aM5vRUbHv1f70BLShwU-4ZcQrV5ZxrtjiKg9V8Rc5yxfKItti_GjGGwn6wg28UYkkiV4CyHuMMa8o2J4/s1600/NewsLinebasnetg.png' width='320'/></a>
</div>
<!-- left_header ends //-->


5. Then Replace your LOGO image URL with  Red coloured image link above.
Logo size : width= 320px and Height = 80 px

How to Add Ads right side of Header Logo
To add advertisements to the right side of Header logo Go to Dashboard , Edit HTML 
  1. Find this code:
<div id='right_header'>
<a href='#' target='_blank'><img height='80' src='https://blogger.googleusercontent.com/img/b/R29vZ2xl/AVvXsEiC2SqC2hJBLMq48tc_WkQTQcHtUPkNsl7Qgdd-zEUcQHJctENQ4xzsxTBViEriBaYIGIeMvS3iDMy6qILno5r4xRMo1U8kAhvOL8qqeVxRN1cGt4k0L0sZL6o6BlktWAe3wtdLUkxwFcg/s1600/ads260.png' style='margin-right:5px; margin-top:10px;' width='260'/></a>

<a href='#' target='_blank'><img height='80' src='https://blogger.googleusercontent.com/img/b/R29vZ2xl/AVvXsEiC2SqC2hJBLMq48tc_WkQTQcHtUPkNsl7Qgdd-zEUcQHJctENQ4xzsxTBViEriBaYIGIeMvS3iDMy6qILno5r4xRMo1U8kAhvOL8qqeVxRN1cGt4k0L0sZL6o6BlktWAe3wtdLUkxwFcg/s1600/ads260.png' style='margin-right:5px; margin-top:10px;' width='260'/></a>

</div><!-- right_header ends //-->
Ads size: width= 260px and Height = 80 px


2. Change Red color URL with your Ads Image host URL.


How to Edit Menu Bar
 1. To edit Menu find the code below:

<div id='menu'>
<div id='center'>
<div id='head_menu'><ul>
  <li><a expr:href='data:blog.homepageUrl'>HOME</a></li>
  <li><a href='#'>NEWS</a></li>
  <li><a href='#'>ENTERTAINMENT</a></li>
  <li><a href='#'>FINANCE</a></li>
  <li><a href='#'>SPORTS</a></li>
  <li><a href='#'>LITERATURE</a></li>
  <li><a href='#'>ARTICLES</a></li>
  <li><a href='#'>MOVIE</a></li>
  <li><a href='#'>FASHION</a></li>
  <li><a href='#'>FOOD</a></li>
  <li><a href='#'>DOWNLOADS</a></li>
</ul>
</div>
</div>
</div><!-- menu ends //-->


2.Now Replace your Link URL with and menu link name to your.

How to Customize Labels for Homepage 
1. To show labels or categories in Homepage, find the code below:

label1 = "AMERICAS";
label2 = "AMERICAS";
label3 = "AMERICAS";
label4 = "AMERICAS";
label5 = "AMERICAS";
label6 = "AMERICAS";
label7 = "AMERICAS";
label8 = "AMERICAS";
label9 = "AMERICAS";
label10 = "AMERICAS";
label11 = "AMERICAS";
label12 = "AMERICAS";
label13 = "AMERICAS";
label14 = "AMERICAS";

Now change the value of each red coloured label(AMERICAS) to the Label you want to show in homepage.

How to add or change 250x60px ads and epapers banners

  1. Go to Dashboard and Click on Layout section
  2. Now you will find HTML/Javascript widget on the right hand side titled "Top_right Ads"
  3. Click on Edit
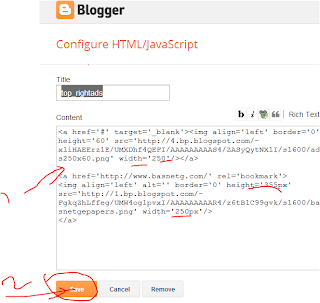
  4. Now the widget will be displayed like below:


Now add your code and click on save.

The code within this widget is in this format :

<a href='#' target='_blank'><img align='left' border='0' height='60' src='https://blogger.googleusercontent.com/img/b/R29vZ2xl/AVvXsEim3ApV7pIGxbFWVbSRkXdvSfk9vRkSpE0wagVYpmS6P2P-kzobuTaP_GMQsa4ipuT4SNpKBCdIzcRdCr0hvjs4oe4gO1CVkF-CdD-PIlhZlPG0PTapCKQShudYe5hM7STeSA6GqA0RuW4/s1600/ads250x60.png' width='250'/></a>
<a href='http://www.basnetg.com/' rel='bookmark'>
<img align='left' alt='' border='0' height='355px' src='https://blogger.googleusercontent.com/img/b/R29vZ2xl/AVvXsEgbpCUBVnQzTPwrdhoLpk2GGKoTZnNog2hHSdZRudb6tfYfmImCy0gPqieTY-0udxsBDTez5Xe2K_RCFg0eaRQZNq43L8uFwPepao_Pfxap0dM0vdR_gLfh8ub5Cy0b8eZ3yFgXuYNxqW0/s1600/basnetgepapers.png' width='250px'/>
</a>

you can use this code and just change your image link url with red coloured image link.OR make your image and ads image whatever your think and like.
 How to add 300x250 ads code

Go to Layout option from your Blogger Dashboard
Now scroll down and  find  HTML/Javascript as in the image below:

Now click on Edit Button and Paste your ads code inside widget box.

How to change Label/Category Title in the Homepage

Go to Dashboard >> Template >> Edit HTML >> Proceed

Now find the CTRL+F: <div id='cat-back'>
 Then you can find code like this : <div id='cat-back'>News <!--news--></div>
Each and Every time find <div id='cat-back'> and change the title just after it.

That's all Likewise Try to edit yourself.

CSS-LightBox POP-UP Facebook Like Box Widget For Blog & Website

Posted by Unknown on | 0 comments | Leave a comment...

 CSS-LightBox POP-UP Facebook Like Box Widget For Blog & Website

As you know that many of the blogger has also have this but here the golden thing is that this is made up of World First Unblockable CSS Lightbox POPUP Works With IE+7 And Other Browsers Too. This is that main thing that make it different from others.
Get the more fans to your fanpage blogger by adding a popup facebook like box to your blogspot.By adding this customized widget may know the visitors to know the number of people like your website and join your site directly. Facebook likebox is widely used social plugin from Facebook developers. The importance of the Facebook Likebox is tremendous in terms of the number of likes it brings. About 90+ % of the fans that you can get here from the Like box installed on the blog.
Today we'll be sharing the latest Facebook Lightbox style popup widget that you can add to your blogger blog (blogspot). There are only one simple step to add is quickly.To get this widget follow below procedure:-
First See The Demo In The Screen Shoot.

Features:
1.) Un-Blockable POP-UP By All Browsers.
2.) POP-UP With LightBox Effect.
3.) Close Button Also Included.
4.) Quick, Quick, Quick To Load And Easy To Install.
5.) Simple And Stylish Design.
6.) No J-Query Only CSS.
7.) Works With IE+7 And Others Too..


How To Add In Blogspot?
1.) Go To Your www.blogger.com
2.) Open Your Desire Blog.
3.) Go To Layout.
4.) Click "Add A Gadget" Where You Want To Add It.
5.) Now Scroll To "HTML-JAVASCRIPT"
6.) Click "+" Icon To Add It.
7.) Now Copy The Below Code And Paste It To There.
8.) Leave The Title Empty.
9.) Click Save, Now You Are Done.


How To Add In Website?
1.) Just Go To Your HTML File.
2.) Now Copy The Below Code And Paste It Between <body> </body>.
3.) Save It, Now You Are Done. 


<!-- This Is A CopyRight Code.It Is Free To Use But With HTML Design Code.
If AnyOne Found To Be Changing This Code Should Be Under Legal Action Via DMCA. -->
<style type="text/css">

/***********************************************
* CSS POP-UP With Light Box Effect- © EXEIdeas (www.exeideas.com)
* This notice must stay intact for use.
* Visit http://www.exeideas.com/ for full source code.
***********************************************/
* html #exestylepopupdiv {position:absolute;}
#exestylepopupdiv {display:block; top:0px; left:0px; width:100%; height:100%; position:fixed; background-image:url('https://blogger.googleusercontent.com/img/b/R29vZ2xl/AVvXsEgMHrSPwJcpDHLhySO31Dg07iNLFyMuvmn3EXxAKiAw1OwfdtcwZtQIZf_HLoxrzUEdEdqUMVKLahkITDna5dq74niq0z0Y09dks6eXbWBHomO5e9-SaWnuV96l_VSIl73Ez-iVAEEMkw/s128/exeideasopacity0.5.png');margin:0; overflow-y:auto;}
#exestylepopup {background-color: #fff; overflow:none;}
.exestylepopup {width:400px; height:420px; position:fixed; top:45%; left:50%; margin-top:-210px; margin-left:-200px; border: 10px solid #999; padding: 20px;}
.exe-title {background:#000;color: #fff;font-size: 20px !important;font-weight:bold;margin:5px 0;border:20px solid #ddd;padding:10px;line-height:25px; font-family:arial !important;}
</style>
<!--[if lte IE 6]>
<style type="text/css">
/*<![CDATA[*/
html {overflow-x:auto; overflow-y:hidden;}
/*]]>*/
</style>
<![endif]-->
<div id="exestylepopupdiv">
<div id="exestylepopup" class="exestylepopup">
<center><h3 class="exe-title">Receive All Updates Via Facebook. Just Click the Like Button Below...</h3></center>
<center>
<iframe src="//www.facebook.com/plugins/likebox.php?href=http%3A%2F%2Fwww.facebook.com%2FEXEIdeas2010&amp;width=300&amp;colorscheme=light&amp;show_faces=true&amp;border_color=%23ffffff&amp;stream=false&amp;header=false&amp;height=258" scrolling="no" frameborder="0" style="border:none; overflow:hidden; width:300px; height:258px;" allowtransparency="true"></iframe>
</center>
<br />
<center style=" float:right; margin-right:35px; font-size:9px;" >Powered By <a style=" font-size:9px; color:#3B78CD; text-decoration:none;" href="http://www.exeideas.com">EXEIdeas</a></center>
<center style=" float:left; margin-left:35px; font-size:9px;cursor:pointer;" ><a style=" font-size:9px; color:#3B78CD; text-decoration:none;" onmouseup="document.getElementById('exestylepopupdiv').style.display='none'">Skip To Continue</a></center>
</div>
</div>
<!-- This Is A CopyRight Code.It Is Free To Use But With HTML Design Code.
If AnyOne Found To Be Changing This Code Should Be Under Legal Action Via DMCA. -->


Customization:
1.) Change Red Text According To Your Desire.
2.) Change Blue Text With Your Facebook FanPage URL.
3.) Save And Done.

Microsoft confirms the release date of Windows 8 tablet Surface and

Posted by Unknown on | 0 comments | Leave a comment...

Microsoft confirms the release date of Windows 8 tablet Surface and
The tablet of Microsoft, announced in mid-June, will begin to be sold on October 26, the same day as the launch of Windows 8. The information was included by the company itself in a report filed on the last day 26 in U.S. Securitues and Exchange Commission, the body which regulates the American stock exchanges.

The company, however, maintains the mystery about the prices. The tablet will come in two versions, with ARM processor or Intel, and the latest rumors that it may cost
US $ 599 and $ 799 respectively.

It remains to be seen whether both will arrive on the same day that because last month, Microsoft said that the model based on Intel CPUs would come to market three months after the release of version ARM. In the document, Microsoft says only that "the next version of our operating system, Windows 8, will be available in October 26, 2012" and that "the same day we will start selling the Surface".

The Surface RT will come with the NVIDIA Tegra ARM processor, while the Surface Pro has as CPU Intel Core i5, being that both models have 10.6-inch screen. The version of Windows 8, which can be RT or Pro, varies according to the model.

Activation of windows 8 will be different

Posted by Unknown on | 0 comments | Leave a comment...

Activation of windows 8 will be different
The Microsoft announced that it has changed the way Windows activation 8 to avoid having the operating system of the company, which will be released on October 26, suffer from the same problems of piracy of previous versions. Now, the manufacturers of the equipment, the OEMs have to tow the activation directly to BIOS of each computer and you will not be able to use the same product key to activate multiple copies of software.

Windows 7 मा Hard Drive लाई फरम्याट नगरि कसरी Partition गर्ने ?

Posted by Unknown on | 0 comments | Leave a comment...

टेक्निकल दुनियाँमा नयाँ नयाँ अपरेटिङग सिस्टमको आगमन सँगै पुरानाको तुलनामा अझ धेरै सुबिधाहरु थपिएर आएका छन । हालै चलन चल्तीमा रहेको अपरेटिङग सिस्टम Windows 7 तथा Vista मा Disk Partition सजिलै गर्न सकिन्छ । पुराना अपरेटिङग सिस्टममा एक चोटि Partition गरिसकेको Hard Drive लाई फेरी partition गर्नु परेमा Format नै गर्नु पर्ने समस्या हालका अपरेटिङग सिस्टममा छैन । यहाँ चर्चा गर्न लागिएको सिस्टम windows 7 मा तपाईंले सजिलै कम्प्युटर फरम्याट नगरीकनै आफ्नो hard drive लाई Partition गर्न सक्नु हुनेछ । Disk management मा उपलब्ध Shrinking र expanding utility प्रोग्रामको सहायताले तपाईंले Partition मात्र हैन drive डिलिट तथा re-size पनि गर्न सक्नु हुनेछ ।
अब यहाँ Hard Drive लाई कसरी partition गर्ने भन्ने बारे Step by Step चर्चा गरौ :

१) सर्वप्रथम "start" बटनमा क्लिक गरौ, त्यहा देखिएको "Computer" मा राईट क्लिक गरौ र "manage" option मा जाऔ ।

२) "Computer Management" नामको नयाँ window खुल्नेछ, त्यहा "Storage" मा क्लिक गरौ र "Disk Management" मा जाऔ ।

३) "Disk Management" मा गईसकेपछि तपाईंले आफ्नो कम्प्युटरमा भएको Drive हरु देख् न सक्नुहुनेछ ।

४) अब तपाईंले कुन drive लाई partition गर्न खोज्नु भएको हो त्यो "Drive" लाई राईट क्लिक गर्नुहोस् र "Shrink Volume" option लाई छान्नुहोस् ।

५) नयाँ window खुल्नेछ जसमा उक्त Drive को Size, Partition को लागि उपलब्ध space र नयाँ partition मा कति amount को space भएको Drive बनाउने भन्ने option हुनेछ । त्यहा तपाईंले नयाँ Partition गर्दा बन्ने drive कती space को बनाउने हो त्यो Value भर्नु पर्नेछ । याद राख्नुहोस् त्यहा Size of available shrink space मा देखिएको भन्दा बढी Space Value त्यहा राख्न पाउनु हुन्न ।


६) Value राखीसकेपछि Shrink बटन क्लिक गर्नुहोस् र procress सकिन केही समय पर्खिनुहोस् । operation सकिएपछि त्यहा तपाईंले unallocates space र तपाईंले अघि राख्न नु भएको exactly value भएको खाली drive देख् नु हुनेछ । अब त्यो unallocated space लेखिएको drive लाई सेलेक्ट गर्नुहोस् र राईट क्लिक गरेर "New Sample Volume" option मा जानुहोस् ।

७) त्यहा नयाँ बन्ने Volume को लेटर कुन राख् ने छान्नुहोस् र next बटन क्लिक गर्नुहोस् ।
८) अब Format पेज देखिनेछ यहाँ निर ध्यान दिनुहोस् कि File System NTFS सेलेक्ट गर्नुहोस् र Volume Label मा उक्त volume को नाम कुन राख् ने हो लेख्नुहोस् ।


९) Next बटन क्लिक गर्नुहोस् र अन्तिममा Finish गर्नुहोस् ।
DineshTamang.com.np भ्रमण गर्नु भएकोमा यहाँहरु लाई मुरी-मुरी धन्यवाद् छ। कृपया फेरिपनी DineshTamang.com.np चियाउदै गर्नुहोला। तपाईंको दिनहरु सधैं शुभ-रहोस्। धन्यवाद् ।

Sorry

Enter your email address:

Most Popular

Search In This Blog

Popular Posts

Tag Cloud

Recent News