Nepal Flag
"Would you Like to Post any thing related to This blog you can send E-mail to me guidedinesh@gmail.com or dinesh_tamang33@yahoo.com"तपाईंहरु पनि यो साईटमा भएका बिषयहरु सँग सम्बन्धित आफ्ना लेखहरु पोस्ट गर्न चाहनु भने तल दिईएको ठेगानामा पठाउनु हुन अनुरोध गर्दछु साथै विज्ञापन तथा अन्यको लागि सम्पर्क ठेगानाः guidedinesh@gmail.com or dinesh_tamang33@yahoo.comतपाईंहरुबाट प्राप्त भएका आर्टिकलहरुलाई सकेसम्म चाडै तपाईंहरुकै नाम दिएर प्रकाशित गरिनेछ ।

FREE custom domain for BLOGGER

Posted by Unknown on | 0 comments | Leave a comment...

How to get a FREE top level custom domain for your blog from blogger.com (Blog from google). These domains are from Freenom.com and you can get
.ga
.cf
.tk
.ml
.gq
domains for FREE! indefinitely!

Go to www.freenom.com for the domains.

======================================================================================================================
A Records (common A records)
======================================================================================================================
216.239.32.21
216.239.34.21
216.239.36.21
216.239.38.21
======================================================================================================================

Like it and share it if you found this helpful. If there's anything to be corrected please let me know in the comments.
More how to videos will be done soon enough so stay tuned. 

Basnetg NEWSLINE Blogger template

Posted by Unknown on | 0 comments | Leave a comment...

Basnetg NewsLine is a Premium Blogger template/PremiumBloggertemplate helps you to start up your own NEWS website on Blogger quickly. It features professional style blogger template for newspapers and magazine sites and works all major browsers, chrome,internet explorer,firefox,safari and opera. Please use this template for free but do not remove the designer link.Thanks


How to install Basnetg NewsLine template for Blogger

  • Download the template Zip Folder from Download Link above.
  • extract all  with help of win zip.
  • Upload template XML file to blogger .
Configure Your Meta Tags 
  • Find below meta tags and change description and keywords in red with your blog description and keywords. Separate keywords with comma.
<meta content='DESCRIPTION HERE' name='description'/>
<meta content='KEYWORDS HERE' name='keywords'/>
How to change Header Logo

  1. Go to Dashboard Click Template option from Dashboard
  2. Now click on Edit HTML tab.
  3. Click on Proceed tab
  4. Now Find this code :
<div id='left_header'><a expr:href='data:blog.homepageUrl'><img height='80' src='https://blogger.googleusercontent.com/img/b/R29vZ2xl/AVvXsEj972uLkJ1yl7z0ABfLyDCPiMM3jkdUp40RaT585WBprYqZzcSbiTqC7lfvqc2aM5vRUbHv1f70BLShwU-4ZcQrV5ZxrtjiKg9V8Rc5yxfKItti_GjGGwn6wg28UYkkiV4CyHuMMa8o2J4/s1600/NewsLinebasnetg.png' width='320'/></a>
</div>
<!-- left_header ends //-->


5. Then Replace your LOGO image URL with  Red coloured image link above.
Logo size : width= 320px and Height = 80 px

How to Add Ads right side of Header Logo
To add advertisements to the right side of Header logo Go to Dashboard , Edit HTML 
  1. Find this code:
<div id='right_header'>
<a href='#' target='_blank'><img height='80' src='https://blogger.googleusercontent.com/img/b/R29vZ2xl/AVvXsEiC2SqC2hJBLMq48tc_WkQTQcHtUPkNsl7Qgdd-zEUcQHJctENQ4xzsxTBViEriBaYIGIeMvS3iDMy6qILno5r4xRMo1U8kAhvOL8qqeVxRN1cGt4k0L0sZL6o6BlktWAe3wtdLUkxwFcg/s1600/ads260.png' style='margin-right:5px; margin-top:10px;' width='260'/></a>

<a href='#' target='_blank'><img height='80' src='https://blogger.googleusercontent.com/img/b/R29vZ2xl/AVvXsEiC2SqC2hJBLMq48tc_WkQTQcHtUPkNsl7Qgdd-zEUcQHJctENQ4xzsxTBViEriBaYIGIeMvS3iDMy6qILno5r4xRMo1U8kAhvOL8qqeVxRN1cGt4k0L0sZL6o6BlktWAe3wtdLUkxwFcg/s1600/ads260.png' style='margin-right:5px; margin-top:10px;' width='260'/></a>

</div><!-- right_header ends //-->
Ads size: width= 260px and Height = 80 px


2. Change Red color URL with your Ads Image host URL.


How to Edit Menu Bar
 1. To edit Menu find the code below:

<div id='menu'>
<div id='center'>
<div id='head_menu'><ul>
  <li><a expr:href='data:blog.homepageUrl'>HOME</a></li>
  <li><a href='#'>NEWS</a></li>
  <li><a href='#'>ENTERTAINMENT</a></li>
  <li><a href='#'>FINANCE</a></li>
  <li><a href='#'>SPORTS</a></li>
  <li><a href='#'>LITERATURE</a></li>
  <li><a href='#'>ARTICLES</a></li>
  <li><a href='#'>MOVIE</a></li>
  <li><a href='#'>FASHION</a></li>
  <li><a href='#'>FOOD</a></li>
  <li><a href='#'>DOWNLOADS</a></li>
</ul>
</div>
</div>
</div><!-- menu ends //-->


2.Now Replace your Link URL with and menu link name to your.

How to Customize Labels for Homepage 
1. To show labels or categories in Homepage, find the code below:

label1 = "AMERICAS";
label2 = "AMERICAS";
label3 = "AMERICAS";
label4 = "AMERICAS";
label5 = "AMERICAS";
label6 = "AMERICAS";
label7 = "AMERICAS";
label8 = "AMERICAS";
label9 = "AMERICAS";
label10 = "AMERICAS";
label11 = "AMERICAS";
label12 = "AMERICAS";
label13 = "AMERICAS";
label14 = "AMERICAS";

Now change the value of each red coloured label(AMERICAS) to the Label you want to show in homepage.

How to add or change 250x60px ads and epapers banners

  1. Go to Dashboard and Click on Layout section
  2. Now you will find HTML/Javascript widget on the right hand side titled "Top_right Ads"
  3. Click on Edit
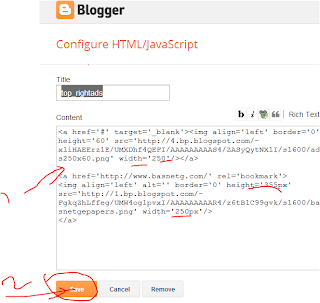
  4. Now the widget will be displayed like below:


Now add your code and click on save.

The code within this widget is in this format :

<a href='#' target='_blank'><img align='left' border='0' height='60' src='https://blogger.googleusercontent.com/img/b/R29vZ2xl/AVvXsEim3ApV7pIGxbFWVbSRkXdvSfk9vRkSpE0wagVYpmS6P2P-kzobuTaP_GMQsa4ipuT4SNpKBCdIzcRdCr0hvjs4oe4gO1CVkF-CdD-PIlhZlPG0PTapCKQShudYe5hM7STeSA6GqA0RuW4/s1600/ads250x60.png' width='250'/></a>
<a href='http://www.basnetg.com/' rel='bookmark'>
<img align='left' alt='' border='0' height='355px' src='https://blogger.googleusercontent.com/img/b/R29vZ2xl/AVvXsEgbpCUBVnQzTPwrdhoLpk2GGKoTZnNog2hHSdZRudb6tfYfmImCy0gPqieTY-0udxsBDTez5Xe2K_RCFg0eaRQZNq43L8uFwPepao_Pfxap0dM0vdR_gLfh8ub5Cy0b8eZ3yFgXuYNxqW0/s1600/basnetgepapers.png' width='250px'/>
</a>

you can use this code and just change your image link url with red coloured image link.OR make your image and ads image whatever your think and like.
 How to add 300x250 ads code

Go to Layout option from your Blogger Dashboard
Now scroll down and  find  HTML/Javascript as in the image below:

Now click on Edit Button and Paste your ads code inside widget box.

How to change Label/Category Title in the Homepage

Go to Dashboard >> Template >> Edit HTML >> Proceed

Now find the CTRL+F: <div id='cat-back'>
 Then you can find code like this : <div id='cat-back'>News <!--news--></div>
Each and Every time find <div id='cat-back'> and change the title just after it.

That's all Likewise Try to edit yourself.

CSS-LightBox POP-UP Facebook Like Box Widget For Blog & Website

Posted by Unknown on | 0 comments | Leave a comment...

 CSS-LightBox POP-UP Facebook Like Box Widget For Blog & Website

As you know that many of the blogger has also have this but here the golden thing is that this is made up of World First Unblockable CSS Lightbox POPUP Works With IE+7 And Other Browsers Too. This is that main thing that make it different from others.
Get the more fans to your fanpage blogger by adding a popup facebook like box to your blogspot.By adding this customized widget may know the visitors to know the number of people like your website and join your site directly. Facebook likebox is widely used social plugin from Facebook developers. The importance of the Facebook Likebox is tremendous in terms of the number of likes it brings. About 90+ % of the fans that you can get here from the Like box installed on the blog.
Today we'll be sharing the latest Facebook Lightbox style popup widget that you can add to your blogger blog (blogspot). There are only one simple step to add is quickly.To get this widget follow below procedure:-
First See The Demo In The Screen Shoot.

Features:
1.) Un-Blockable POP-UP By All Browsers.
2.) POP-UP With LightBox Effect.
3.) Close Button Also Included.
4.) Quick, Quick, Quick To Load And Easy To Install.
5.) Simple And Stylish Design.
6.) No J-Query Only CSS.
7.) Works With IE+7 And Others Too..


How To Add In Blogspot?
1.) Go To Your www.blogger.com
2.) Open Your Desire Blog.
3.) Go To Layout.
4.) Click "Add A Gadget" Where You Want To Add It.
5.) Now Scroll To "HTML-JAVASCRIPT"
6.) Click "+" Icon To Add It.
7.) Now Copy The Below Code And Paste It To There.
8.) Leave The Title Empty.
9.) Click Save, Now You Are Done.


How To Add In Website?
1.) Just Go To Your HTML File.
2.) Now Copy The Below Code And Paste It Between <body> </body>.
3.) Save It, Now You Are Done. 


<!-- This Is A CopyRight Code.It Is Free To Use But With HTML Design Code.
If AnyOne Found To Be Changing This Code Should Be Under Legal Action Via DMCA. -->
<style type="text/css">

/***********************************************
* CSS POP-UP With Light Box Effect- © EXEIdeas (www.exeideas.com)
* This notice must stay intact for use.
* Visit http://www.exeideas.com/ for full source code.
***********************************************/
* html #exestylepopupdiv {position:absolute;}
#exestylepopupdiv {display:block; top:0px; left:0px; width:100%; height:100%; position:fixed; background-image:url('https://blogger.googleusercontent.com/img/b/R29vZ2xl/AVvXsEgMHrSPwJcpDHLhySO31Dg07iNLFyMuvmn3EXxAKiAw1OwfdtcwZtQIZf_HLoxrzUEdEdqUMVKLahkITDna5dq74niq0z0Y09dks6eXbWBHomO5e9-SaWnuV96l_VSIl73Ez-iVAEEMkw/s128/exeideasopacity0.5.png');margin:0; overflow-y:auto;}
#exestylepopup {background-color: #fff; overflow:none;}
.exestylepopup {width:400px; height:420px; position:fixed; top:45%; left:50%; margin-top:-210px; margin-left:-200px; border: 10px solid #999; padding: 20px;}
.exe-title {background:#000;color: #fff;font-size: 20px !important;font-weight:bold;margin:5px 0;border:20px solid #ddd;padding:10px;line-height:25px; font-family:arial !important;}
</style>
<!--[if lte IE 6]>
<style type="text/css">
/*<![CDATA[*/
html {overflow-x:auto; overflow-y:hidden;}
/*]]>*/
</style>
<![endif]-->
<div id="exestylepopupdiv">
<div id="exestylepopup" class="exestylepopup">
<center><h3 class="exe-title">Receive All Updates Via Facebook. Just Click the Like Button Below...</h3></center>
<center>
<iframe src="//www.facebook.com/plugins/likebox.php?href=http%3A%2F%2Fwww.facebook.com%2FEXEIdeas2010&amp;width=300&amp;colorscheme=light&amp;show_faces=true&amp;border_color=%23ffffff&amp;stream=false&amp;header=false&amp;height=258" scrolling="no" frameborder="0" style="border:none; overflow:hidden; width:300px; height:258px;" allowtransparency="true"></iframe>
</center>
<br />
<center style=" float:right; margin-right:35px; font-size:9px;" >Powered By <a style=" font-size:9px; color:#3B78CD; text-decoration:none;" href="http://www.exeideas.com">EXEIdeas</a></center>
<center style=" float:left; margin-left:35px; font-size:9px;cursor:pointer;" ><a style=" font-size:9px; color:#3B78CD; text-decoration:none;" onmouseup="document.getElementById('exestylepopupdiv').style.display='none'">Skip To Continue</a></center>
</div>
</div>
<!-- This Is A CopyRight Code.It Is Free To Use But With HTML Design Code.
If AnyOne Found To Be Changing This Code Should Be Under Legal Action Via DMCA. -->


Customization:
1.) Change Red Text According To Your Desire.
2.) Change Blue Text With Your Facebook FanPage URL.
3.) Save And Done.

Top 10 FREE Data Recovery Software

Posted by Unknown on | 0 comments | Leave a comment...

तपाईंलाई अबस्य पनि कहिले न कहिले यस्तो समस्या परेको नै होला कि आफ्नो महत्वपूर्ण फाइल वा फोल्डर गल्तीले डिलिट भएको ? अथवा कुनै समस्याको कारण आफ्नो कम्प्युटर फरम्याट गर्नु परेको । कुनै न कुनै कारण यस्तै कुनै महत्वपूर्ण फाइल वा फोल्डर गुमाउनु परेको । त्यो डिलिट भई सकेको फाइल फेरी पाउन सकिन्छ ? अबस्य पनि, त्यसको लागि "Data Recovary" सफ्टवयर प्रयोग गर्नु पर्ने हुन्छ । यस्तै सफ्टवयर बारे पहिले पनि जानकारी दिई सकेको थिए (यहा क्लिक गरेर हेर्न सक्नु हुन्छ)
यस्तै ठुलो समस्या समाधानको लागि यहाँ Top 10 Data Recovery software हरु बारे जानकारी दिन गईरहेको छु

सर्वप्रथम डाटा recovery गर्दा रामो result को लागि ध्यान दिनुपर्ने कुराहरु :
१) आफुलाई चाहिने डाटा accidental डिलिट भईसके पछि सके सम्म उक्त HardDrive नचलाऊने किन भने उक्त HardDrive को windows मा Disk र registry activity background मा save भईराखेको हुन्छ ।
२) सकेसम्म Data Recovery software त्यही HardDrive मा install नगर्ने ।
३) Recovered भएका फाइलहरु recover गरिएको HardDrive मा save नगर्ने

1) PC INSPECTOR File Recovery


PC INSPECTOR File Recovery is a data recovery program that supports the FAT 12/16/32 and NTFS file systems. Finds partitions automatically, even if the boot sector or FAT has been erased or damaged. Recovers files with the original time and date stamp. Supports the saving of recovered files on network drives. Recovers files, even when a header entry is no longer available. Setup file is 5.83 MB in size.
[ Download PC INSPECTOR File Recovery ]

2) Recuva


From the maker of the popular CCleaner. Recuva (pronounced “recover”) is a freeware Windows utility to restore files that have been accidentally deleted from your computer. This includes files emptied from the Recycle bin as well as images and other files that have been deleted by user error from digital camera memory cards or MP3 players. It will even bring back files that have been deleted by bugs, crashes and viruses! Setup is only 646 KB in size and it’s portable.
[ Download Recuva ]

3) Panda Recovery


Pandora Recovery actually recovers files permanently removed from Recycle Bin, files originally deleted using Shift + Delete keys bypassing Recycle Bin and files deleted from DOS prompt. Pandora Recovery allows you to find and recover recoverable deleted files from NTFS-formatted volumes, regardless of their type – you can recover pictures, songs, movies or documents. Setup file is 2.12 MB in size.
[ Download Panda Recovery ]

4) TOKIWA DataRecovery


DataRecovery is freeware and written by TOKIWA to undelete accidentally deleted files even from recycle bin. It supports FAT12, FAT16, FAT32 and NTFS undeletion. Even in both NTFS compressed files and EFS encrypted files. Zip file is only 198 KB in size, no installation required and it’s portable.
[ Download TOKIWA DataRecovery ]

5) SoftPerfect File Recovery


SoftPerfect File Recovery is a free and useful tool to restore accidentally deleted files from hard and floppy disks, USB flash drives, CF and SD cards and other storage media. It supports the popular file systems such as FAT12, FAT16, FAT32, NTFS and NTFS5 with compression and encryption. If your important files disappeared and you can’t find them in the recycle bin, try this software product and get the files back to life. Easy to use, no installation is required. Program is only 247 KB in size.
[ Download SoftPerfect File Recovery ]

6) Undelete Plus


Undelete Plus is a quick and effective way to restore accidentally deleted files. It can also recover files that have been emptied from the Recycle Bin, permanantly deleted files within Windows using the Shift + Delete, and files that have been deleted from within a Command Prompt. Undelete Plus works under Win 95/98/Me/NT/2000/XP/2003/Vista operating systems. The program supports all Windows file systems for hard and floppy drives including FAT12/16/32,NTFS/NTFS5 and image recovery from CompactFlash, SmartMedia, MultiMedia and Secure Digital cards. Program is only 583 KB in size and requires no installation. Portable.
[ Download Undelete Plus ]

7) FreeUndelete


FreeUndelete is data recovery program for deleted files. In case of accidental deletion of files on a NTFS (used by default in Windows XP, 2000 and NT), FAT32 or FAT16 file systems FreeUndelete is the utility to help. Setup file is 866 KB in size.
[ Download FreeUndelete ]

8) ADRC Data Recovery Software Tools


ADRC Data Recovery Software Tools contains a collection of DIY data recovery tools that supports a wide variety of drives and file systems. The software incorporates extremely simple GUI with novice users in mind. The software zooms in to do only critical recovery functions with minimum complexity so one could recover the data easily. It gives you full control to undelete files, disk image back up, restore a backup image, copy files from hard disk with bad sectors, disk cloning, backup, edit and restore your boot parameters. No installation required, portable and program is only 132 KB in size.
[ Download ADRC Data Recovery Software Tools ]

9) Glary Undelete


Glary Undelete is a free and easy-to-use yet powerful file undelete solution for FAT and NTFS file systems. It will bring back files emptied from the Recycle Bin, in a DOS window, from Windows Explorer with the SHIFT key held down. It will even recover files that have been deleted by bugs, crashes and viruses! Glary Undelete works under Win 95/98/Me/NT/2000/XP/2003/Vista operating systems. The program supports all Windows file systems for hard and floppy drives including FAT12/16/32,NTFS/NTFS5 and image recovery from CompactFlash, SmartMedia, MultiMedia and Secure Digital cards. Setup is 1.17 MB in size.
[ Download Glary Undelete ]

10) Avira UnErase Personal


Avira UnErase recovers data that have been deleted from the hard drive – either accidentally or as a result of a virus infection, an uninstaller or defective software. The danger of important data being lost forever is averted with Avira UnErase. Setup file is 402 KB in size.
[ Download Avira UnErase Personal ]

Add scrolling text/images to your blog.

Posted by Unknown on | 0 comments | Leave a comment...

Actually this is known as "marquee" code. This is a non-standard HTML code which causes text/images to scroll/slide in up,down,left or right direction.


 The Code
<marquee behavior="scroll" direction="up"
width=200 height=50
onmouseover="this.stop()" scrollamount="5" onmouseout="this.start()" bgcolor="#191919" align="middle">

Your Text/Image/other HTML code

</marquee>


Add this code to Add a Gadget > HTML/Java script

Customization of above code.

Add your text or image to the red text. You can also add another HTML code there.

1. behavior: 
scroll - text will scroll
slide - text will slide
alternate - text will bounce back and forth


2. direction
You may change this to Left, Right, Up or Down


3. scrollamount/scrolldelay
More the scrollamount more the scrolling/sliding speed


4. bgcolor
It is a background color. Read about HTML color code picker here.


5. align
It may be middle, left or right


6.Width and Height
As per your needs


new menu

Posted by Unknown on | 0 comments | Leave a comment...

Posted by Unknown on | 0 comments | Leave a comment...

Auto apply lightbox effect to all images

In my blog ,DJ Remix Town asked me for how to auto applied Lightbox effect to all images uploaded ,do not need to edit HTML and add rel="lightbox" manually. And now I have the answer for this question :

How to do this ?

First ,you need to read this post and follow all my instruction for install jquery lightbox to blog .

The magic is on the second step ,find and replace this code
<script type="text/javascript">
$(function() {
$('a[rel*=lightbox]').lightBox();
});
</script>

with this

<script type="text/javascript">
$(function() {
$('a[href$=jpg], a[href$=JPG], a[href$=jpeg], a[href$=JPEG], a[href$=png], a[href$=gif], a[href$=bmp]:has(img)').lightBox();
});
</script>

The difference between them is this line $('a[href$=jpg], a[href$=JPG], a[href$=jpeg], a[href$=JPEG], a[href$=png], a[href$=gif], a[href$=bmp]:has(img)').lightBox(); 
This line mean Lightbox effect will be applied to all <a ...> tag which has an <img> tag inside ,and the href attribute of a tag is a link to image file (with the extension : gif,bmp,jpeg,png,jpg)

From now ,you can upload and insert images to your post using uploader in post editor window and don't care for the rest . Lightbox effect will be applied to all images .

Complete List of Tutorials

Posted by Unknown on | 0 comments | Leave a comment...

visit this site for blog tricks

Complete List of Tutorials

How to Disable right click on blogger

Posted by Unknown on | 0 comments | Leave a comment...


Login To Blogger Go To > Design > Page Elements.

Simply add a Gadget of HTML/JavaScript type.

add this code in to it:

<script language="JavaScript">
<!--

//Disable right mouse click Script
//By Maximus (maximus@nsimail.com) w/ mods by DynamicDrive
//For full source code, visit http://www.dynamicdrive.com

var message="Function Disabled!";

///////////////////////////////////
function clickIE4(){
if (event.button==2){
alert(message);
return false;
}
}

function clickNS4(e){
if (document.layers||document.getElementById&&!document.all){
if (e.which==2||e.which==3){
alert(message);
return false;
}
}
}

if (document.layers){
document.captureEvents(Event.MOUSEDOWN);
document.onmousedown=clickNS4;
}
else if (document.all&&!document.getElementById){
document.onmousedown=clickIE4;
}

document.oncontextmenu=new Function("alert(message);return false")

// -->
</script>
Now click save.

or here is another way

Login To Blogger Go To > Design > Edit HTML.

and mark the tick box "Expand Widget Templates"

Then, find (CTRL+F) this code in the template.
</head>
And immediately before it, paste this code:
<script src='http://ajax.googleapis.com/ajax/libs/jquery/1.3.2/jquery.min.js' type='text/javascript'/>

<script type='text/javascript'>
//<![CDATA[

$(document).ready(function(){
$(document).bind("contextmenu",function(e){
return false;
});
});

//]]>
</script>
Now save your template and you are done.

How to Disable Copy and Paste in Your Blogger Blog

Posted by Unknown on | 0 comments | Leave a comment...

Thinking of a way to make it more difficult for people to copy the contents of your blog? Here's a neat little JavaScript that will disable Copy and Paste.

Login To Blogger Go To > Design > Edit HTML.

and mark the tick box "Expand Widget Templates"

Then, find (CTRL+F) this code in the template.

</head>
And immediately before it, paste this code:

<!-- Disable Copy and Paste-->
<script language='JavaScript1.2'>
function disableselect(e){
return false
}
function reEnable(){
return true
}
document.onselectstart=new Function (&quot;return false&quot;)
if (window.sidebar){
document.onmousedown=disableselect
document.onclick=reEnable
}
</script>
Here we are using JavaScript to disable copy and paste on website or blog . So If someone disables the browser JavaScript support , the contents could be easily copie
DineshTamang.com.np भ्रमण गर्नु भएकोमा यहाँहरु लाई मुरी-मुरी धन्यवाद् छ। कृपया फेरिपनी DineshTamang.com.np चियाउदै गर्नुहोला। तपाईंको दिनहरु सधैं शुभ-रहोस्। धन्यवाद् ।

Sorry

Enter your email address:

Most Popular

Search In This Blog

Popular Posts

Tag Cloud

Recent News